BLACK MOUNTAIN COMPLEX PETROGLYPHS
Recovering Indian history from ancient Native American rock writings.
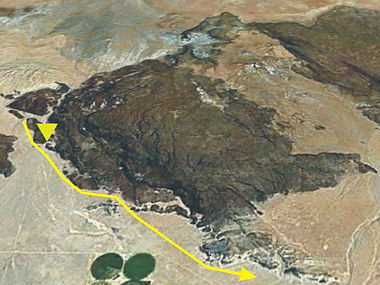
Base-of-the-ridgeline
It would be a mistake to assume that 'nothing happened' in the area that represents the Base-of-the-Ridgeline, indicated by the yellow line, even though there are no 'classic/artistic' petroglyphs or sites yet discovered. This period, estimated to be one and a half days, appears to have been a running battle with no clear-cut beginning or end to skirmishes between any specific individual groups of Attackers or Defenders. There is a petroglyph in the Deer Valley Rock Art Center, Phoenix, Arizona, which provides some details covering this period of the battle.
* Note the terrain setback at the right side of the yellow line.
Setbacks
There are three naturally occuring setbacks along the battle route. These setbacks appear to have been manufactured and incorporated into the battlefield replica.
The Boot
From the air, an observer can see the resemblance to a Boot. This boot provides a very specific location, within the Complex, which can be identified in some rock faces and glyph symbols.
Heel-of-the-Boot
The heel of the Boot does not play much of role in the rock faces and glyphs within the Complex, but it did provide warriors on the run a quick reference navigational aide to avoid following the setback, which would have wasted valuable time and energy. The setback from the calf-of-the-boot to the heel-of-the-boot is incorporated into the scaled replica section referred to as Wash Basin by Wilson Turner.
Toe-of-the-Boot
The Toe-of-the-Boot plays a significant role in one or more glyphs within the Complex and the Deer Valley Rock Art Center.
Toe-to-Toe Setback
The Toe-to-Toe setback is a series of arroyos with walls eight to twelve feet high, not concussive to fast travel. An assimilation of this setback is incorporated into the scale model replica of the battle route that terminates at Inscription Canyon. Thousands of workers using handheld stone hoes, baskets and woven mats could have accomplished the assimilation, by relocating several hundred thousand cubic yards of dirt.
The Shoe
Again, an Ariel view of the terrain provides the resemblance of footwear, but this time, the reduced size and shape causes the landscape to resemble an old shoe. This shoe is not prominent in the Complex petroglyphs, as is the boot. There may be several reasons for this difference; among them may be a lack of knowledge or memories regarding the activities in the vicinity, the terrain feature did not figure into the defensive strategies as much as other considerations, such as the major fighting that took place as consolidated forces on both sides’ attempted renewed attacks and counter-attacks.
Shoe Heel
Like the two previous setbacks, the Shoe Heel Setback is also incorporated into the replica; at the section, Wilson Turner named Inscription Canyon-East. The shoe is not as propionate as the boot, but the toe of the shoe is referred to by this author as Hinkley Gate, because it is the only 'high-speed' access to the Tortoise Head Gap, a more easily defendable position than the open ground upon which the defenders had been unsuccessfully attempting to fight.
Consolidation and Reorganization:
The 'Shoe' or Hinkley Gate is the location where the decimated Main Forces of the defenders and the retrograde Rear Guard defending the escape route on to the mountain began to consolidate their remaining forces and reorganize for a counter-attack. The assessment of a planned consolidation and reorganization is supported by a detailed glyph in the Deer Valley Rock Art Center, which provides indications that a meeting took place between the leaders of the Main Forces and the Rear Guard prior to a massive counter-attack, at Hinkley Gate, against the right flank of the pursuing enemy forces. The glyph suggests that until the Main Forces rounded the Boot, there were two groups of defenders, one large, one small. However, after rounding the boot, the two groups appear to disappear and/or merge into a single unit, as they continued up the mountain. This counter-attack could be considered successful; in that, it successfully stalled the enemy pursuit and permitted the surviving Main Forces to reach their target location, a narrowing chokepoint, referred to by this author as Tortoise Head Gap. It also permitted the bulk of the surviving Rear Guard to pursue a parallel course, which would draw more enemy forces away from the Main Force of defenders within the gap; and, facilitate a second consolidation of surviving defenders near the base of the Spur.
The second consolidation was also successful, but it is necessary to backtrack and study the Rear Guard at Lost Site, near Murphy’s’ Well and the initial consolidation of the surviving members of the two defending forces. (See also: Secondary Attack Route)


The purpose of this site is to inspire awareness, preservation and research of all rock art/writings. As the site grows and develops, it is hoped that YOU will help in these efforts by submitting questions, comments and suggestions: Our primary means of communication is the 'Contact' button above.
© 2023 by My site name. Proudly created with Wix.com